Category: Salesforce Mulesoft
Getting Started with MuleSoft: Developing Your First Mule Project for Salesforce
This article will explain how to create a Mule project with the help of MuleSoft Anypoint Studio, that can extract Lead records from Salesforce CRM using Salesforce Connector, save extracted records in a CSV file on your local machine and send an email on finish.
Your 1st project in Anypoint Studio
To create the implementation, we’re going to use Anypoint Studio – An eclipse-based IDE that allows you to visually and programmatically develop, test, and deploy your Mule implementation.
Get set up
- Download and install Anypoint Studio 7
- Download the Sample Mule application jar.
Start up Anypoint Studio and import the Sample Application by:
- Click File –> Import.
- Select Anypoint Studio –> Packaged mule application (.jar).
- Select the Sample Mule Application jar file downloaded above.
- Click Finish.
Your imported project will include one Mule Flow with a module populated on the canvas as below:

Configuring the Properties
Open mule-artifact.properties file from src/main/resources, update the following properties and save the file.
- sfdc.username=<salesforce_username>
- sfdc.password=<salesforce_password>
- sfdc.securitytoken=<salesforce_securitytoken>
- smtp.from=<from_gmail_address>
- smtp.toAddress=<to_address>
- smtp.user=<from_gmail_user>
- smtp.password=<from_gmail_password>
Application Walkthrough

- Scheduler Endpoint (Trigger): The Scheduler component allows you to trigger a flow when a time-based condition is met. You can configure it to be triggered at a regular interval or give it a more flexible cron expression. For example, a Scheduler might trigger an event to start a flow every 5 seconds or every 1 hour.
Schedulers follow the timezone used by the machine where the Mule runtime is running. If an application is running in CloudHub, the timezone that the Scheduler conforms to corresponds to the region in which the CloudHub worker is running. - Salesforce Connector: The Anypoint Salesforce Connector lets you connect to the Salesforce platform APIs. This connector exposes methods for accessing Salesforce, including working with the Salesforce Apex classes.
This connector works with the Salesforce SOAP API, REST API, Bulk API, and Streaming API, depending on the operation you configure. Each API call uses an XML request and response over an HTTPS connection. All required request headers, error handling, and HTTPS connection configurations are built into the connector.
Requirements for using the connector:- Salesforce developer account.
- Security token – You can receive a new security token by email if you run Reset Security Token through My Personal Information from the Salesforce Setup pages.
- Consumer key and Secret – Required if you are using the OAuth API.
- Namespace and schema location: If you plan to create the XML for your Mule application by hand, you need to include the correct namespace and schema location in your XML file. Anypoint Studio adds this information to the XML file automatically when you add the Salesforce connector to a flow in a Mule app.
In our application we are using Cached Basic Username Password OAuth connection that require Username, password and Security Token to access your Salesforce org.
- Set Variable: The Set Variable (set-variable) component is for creating or updating a variable to store values for use within the flow of a Mule app. You can store simple literal values such as strings or messages, message payloads, or attribute objects. For example, you might store the original payload of a message (before it is processed) so you can use it later in the flow or within an error handler. It has 4 properties: Variable Name (Required), Value (Required), Mime Type (Optional. Such as text/plain or application/json.) and Encoding (Optional. Such as UTF-8).
Example: Here we are storing the total number of records returned by the query.<set-variable value=“#[sizeOf(payload)]” doc:name=“numberOfRecords” variableName=“numberOfRecords”/>
- Logger: This Core component can help you monitor or even debug your Mule app by logging important information such as error messages, status notifications, payloads, and so on. You can add a Logger anywhere in a flow, and you can configure it to log a string that you specify, the output of a DataWeave expression you write, or any combination of strings and expressions.
Example:
<logger doc:name=“Logger” message=“#[sizeOf(payload) ++‘ lead records found…‘]” level=“INFO” />You can specify one of the value for Log Level: ERROR, WARN, INFO, DEBUG, or TRACE. If no level attribute is set, the logger logs at the INFO level.
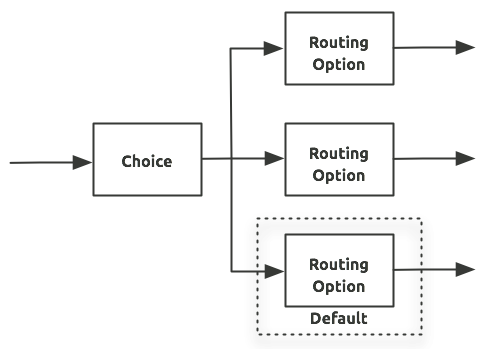
- Choice Route: The effect is to add conditional processing to a flow, similar to an if/then/else code block in most programming languages.
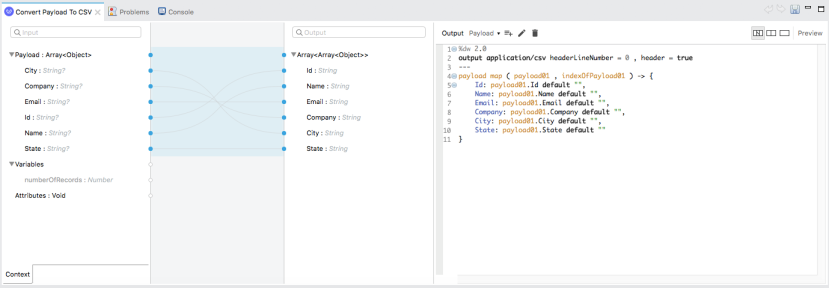
- Transform Message (Convert Payload to CSV): The Transform (or Transform Message) component converts input data to a new output structure or format. You can use the component’s visual mapper to build your transformation implicitly by dragging and dropping elements of the incoming data structure, or you can explicitly write a transformation script in DataWeave expression language.
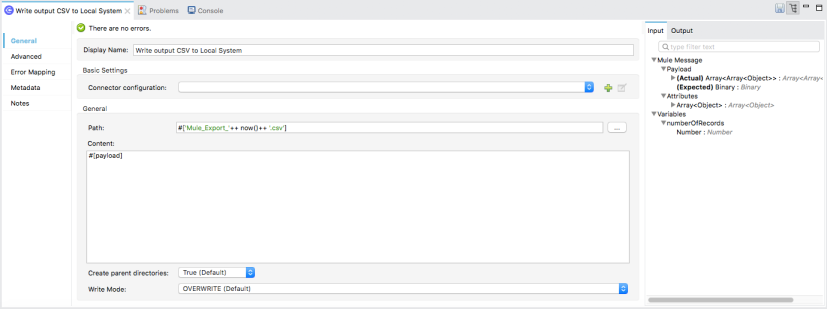
- Write (Write output CSV to Local System): A Write operation is available to the File, FTP, and SFTP connectors. For these connectors, the operation writes content into the given path on demand. By default, the connector writes whatever is in the message payload. However, if the payload is a different format (for example, not CSV) and you need to transform it before writing it, what do you do? If you place a Transform component before the Write operation, the message payload changes and that impacts the operation that is placed after the Write operation.
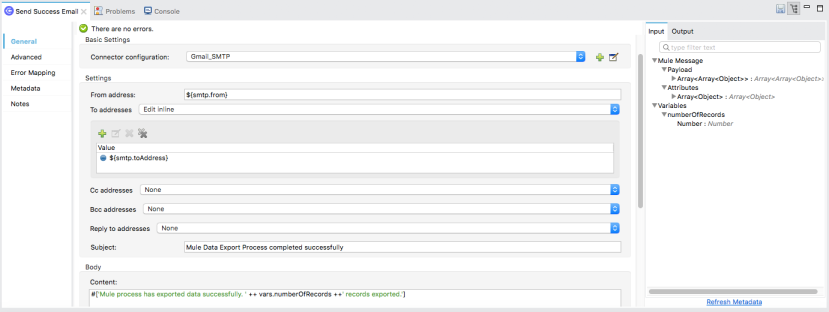
- Sending Emails with the Email Connector: The Email connector can send messages over SMTP and SMTPS. In the example below, To addresses contains the primary recipient addresses (mentioned in smtp.toAddress property) of the outgoing email. The From address attribute is the email sender address (smtp.from property), and the subject is the email subject. The body is composed of content text and a contentType that specifies the mime type of the content (for example, text/xml or text/plain). If no body is specified, the content of the message payload is used by default. If that payload is not text, the operation will fail with an EMAIL:SEND error.
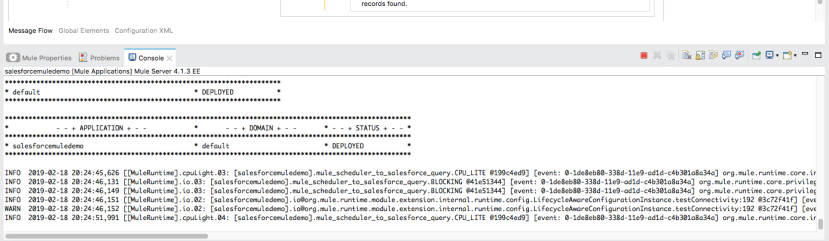
Run and test your implementation:
You’re now ready to run your application and validate that it works as expected by simply right clicking an empty area of the canvas and selecting Run project salesforcemuledemo. This will start up the JVM and launch your application. A successful running application showing the following in the Console tab and you will receive an email with number of records exported in CSV.
Next Steps
Congrats! You are now done building your app and you are ready to deploy your app to cloud. In the next guide, you’ll be deploying to cloud, monitoring your instance, and gaining insights about your application all within Anypoint Platform to complete your introduction to the platform!
Resources:
MuleSoft Documentation
Anypoint Salesforce Connector
Anypoint Studio
