Getting Started with MuleSoft: Developing Your First Mule Project for Salesforce

This article will explain how to create a Mule project with the help of MuleSoft Anypoint Studio, that can extract Lead records from Salesforce CRM using Salesforce Connector, save extracted records in a CSV file on your local machine and send an email on finish.

There are two ways you can build and deploy your mule applications: Anypoint Design Center and Anypoint Studio. This post is about Anypoint Studio. With Anypoint Studio Build integrations graphically or in XML.

Your 1st project in Anypoint Studio

To create the implementation, we’re going to use Anypoint Studio – An eclipse-based IDE that allows you to visually and programmatically develop, test, and deploy your Mule implementation.

Get set up

Start up Anypoint Studio and import the Sample Application by:

  1. Click File –> Import.
  2. Select Anypoint Studio –> Packaged mule application (.jar).
  3. Select the Sample Mule Application jar file downloaded above.
  4. Click Finish.

Your imported project will include one Mule Flow with a module populated on the canvas as below:

Configuring the Properties

Open mule-artifact.properties file from src/main/resources, update the following properties and save the file.

  • sfdc.username=<salesforce_username>
  • sfdc.password=<salesforce_password>
  • sfdc.securitytoken=<salesforce_securitytoken>
  • smtp.from=<from_gmail_address>
  • smtp.toAddress=<to_address>
  • smtp.user=<from_gmail_user>
  • smtp.password=<from_gmail_password>

Application Walkthrough

  1. Scheduler Endpoint (Trigger): The Scheduler component allows you to trigger a flow when a time-based condition is met. You can configure it to be triggered at a regular interval or give it a more flexible cron expression. For example, a Scheduler might trigger an event to start a flow every 5 seconds or every 1 hour.
    Schedulers follow the timezone used by the machine where the Mule runtime is running. If an application is running in CloudHub, the timezone that the Scheduler conforms to corresponds to the region in which the CloudHub worker is running.

  2. Salesforce Connector: The Anypoint Salesforce Connector lets you connect to the Salesforce platform APIs. This connector exposes methods for accessing Salesforce, including working with the Salesforce Apex classes.
    This connector works with the Salesforce SOAP API, REST API, Bulk API, and Streaming API, depending on the operation you configure. Each API call uses an XML request and response over an HTTPS connection. All required request headers, error handling, and HTTPS connection configurations are built into the connector.
    Requirements for using the connector:

    • Salesforce developer account.
    • Security token – You can receive a new security token by email if you run Reset Security Token through My Personal Information from the Salesforce Setup pages.
    • Consumer key and Secret – Required if you are using the OAuth API.
    • Namespace and schema location: If you plan to create the XML for your Mule application by hand, you need to include the correct namespace and schema location in your XML file. Anypoint Studio adds this information to the XML file automatically when you add the Salesforce connector to a flow in a Mule app.

    In our application we are using Cached Basic Username Password OAuth connection that require Username, password and Security Token to access your Salesforce org.

  3. Set Variable:  The Set Variable (set-variable) component is for creating or updating a variable to store values for use within the flow of a Mule app. You can store simple literal values such as strings or messages, message payloads, or attribute objects. For example, you might store the original payload of a message (before it is processed) so you can use it later in the flow or within an error handler. It has 4 properties: Variable Name (Required), Value (Required), Mime Type (Optional. Such as text/plain or application/json.) and Encoding (Optional. Such as UTF-8).
    Example: Here we are storing the total number of records returned by the query.

    <set-variable value=“#[sizeOf(payload)]” doc:name=“numberOfRecords” variableName=“numberOfRecords”/>

  4. Logger: This Core component can help you monitor or even debug your Mule app by logging important information such as error messages, status notifications, payloads, and so on. You can add a Logger anywhere in a flow, and you can configure it to log a string that you specify, the output of a DataWeave expression you write, or any combination of strings and expressions.
    Example:
    <logger doc:name=“Logger” message=“#[sizeOf(payload) ++ lead records found…‘]” level=“INFO” />

    You can specify one of the value for Log Level: ERROR, WARN, INFO, DEBUG, or TRACE. If no level attribute is set, the logger logs at the INFO level.

  5. Choice Route:  The effect is to add conditional processing to a flow, similar to an if/then/else code block in most programming languages.
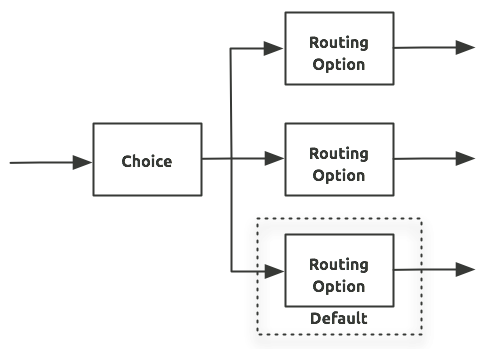
    component-choice-schematic
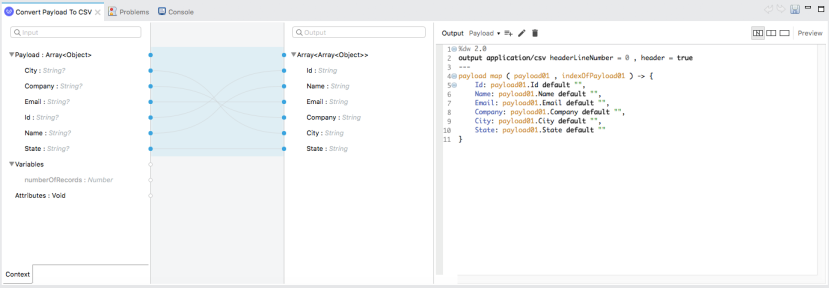
  6. Transform Message (Convert Payload to CSV): The Transform (or Transform Message) component converts input data to a new output structure or format. You can use the component’s visual mapper to build your transformation implicitly by dragging and dropping elements of the incoming data structure, or you can explicitly write a transformation script in DataWeave expression language.Transform Message
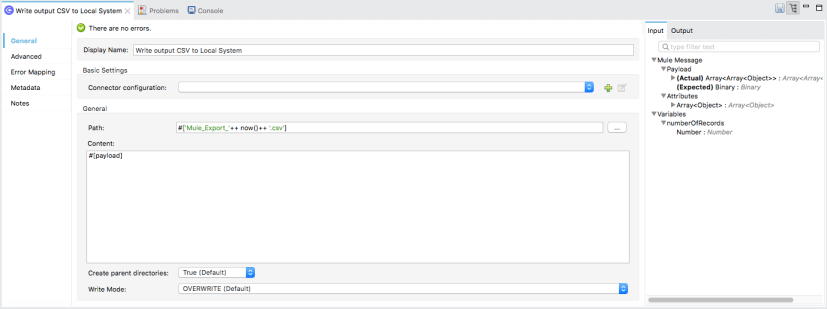
  7. Write (Write output CSV to Local System): A Write operation is available to the File, FTP, and SFTP connectors. For these connectors, the operation writes content into the given path on demand. By default, the connector writes whatever is in the message payload. However, if the payload is a different format (for example, not CSV) and you need to transform it before writing it, what do you do? If you place a Transform component before the Write operation, the message payload changes and that impacts the operation that is placed after the Write operation.Write File
  8. Sending Emails with the Email Connector: The Email connector can send messages over SMTP and SMTPS. In the example below, To addresses contains the primary recipient addresses (mentioned in smtp.toAddress property) of the outgoing email. The From address attribute is the email sender address (smtp.from property), and the subject is the email subject. The body is composed of content text and a contentType that specifies the mime type of the content (for example, text/xml or text/plain). If no body is specified, the content of the message payload is used by default. If that payload is not text, the operation will fail with an EMAIL:SEND error.
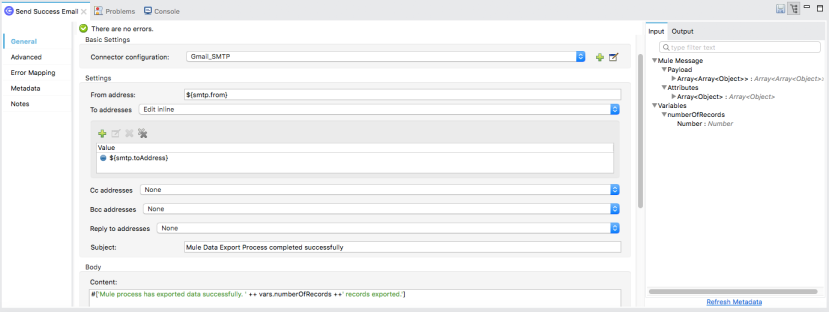
    Send Email

Run and test your implementation:

You’re now ready to run your application and validate that it works as expected by simply right clicking an empty area of the canvas and selecting Run project salesforcemuledemo. This will start up the JVM and launch your application. A successful running application showing the following in the Console tab and you will receive an email with number of records exported in CSV.

result

Next Steps

Congrats! You are now done building your app and you are ready to deploy your app to cloud. In the next guide, you’ll be deploying to cloud, monitoring your instance, and gaining insights about your application all within Anypoint Platform to complete your introduction to the platform!

Resources:

MuleSoft Documentation
Anypoint Salesforce Connector
Anypoint Studio
Configure SAML base Single Sign On(SSO) for Salesforce Communities

Single Sign-On is a process that allows network users to access all authorised network resources without having to separately log in to each resource. 

Salesforce offers the following ways to use single sign-on:

  • Federated authentication using Security Assertion Markup Language (SAML)
  • Delegated authentication single sign-on that enables you to integrate Salesforce with an authentication method that you choose.

In this post, We will be discussing how to configure SAML based single sign on for communities between two Salesforce Orgs where one will act as Identity Provider and Second will be a Service Provider with Community enabled and configured.

Before we start this configuration, Lets talk few words about SAML – SAML stands for “Security Assertion Markup Language”. It is an XML-based standard that allows you to communicate authentication decisions between one service and another. SAML is the gold standard for single sign-on for cloud apps. It eliminates all passwords and instead uses digital signatures to establish trust between the identity provider and the cloud app. You can read more about SAML here.

For this, I have created two Developer Orgs where one is used as Identity Provider and another one as Service Provider. Service Provider org has a Community named “developers” configured in it. Below  are the steps for SSO configuration between these two orgs.

Step 1: Enable Domain in both Organizations

If your Salesforce organizations has domains deployed that’s good. If not, Go to Setup –> Administrative Setup –> Domain Management and click on My Domain. On this screen enter a new domain name, and click Check Availability. If the name is available, click the Terms and Conditions check box, then click Register Domain.

Step 2: Enable Identity Provider in  your Identity Provider Organization

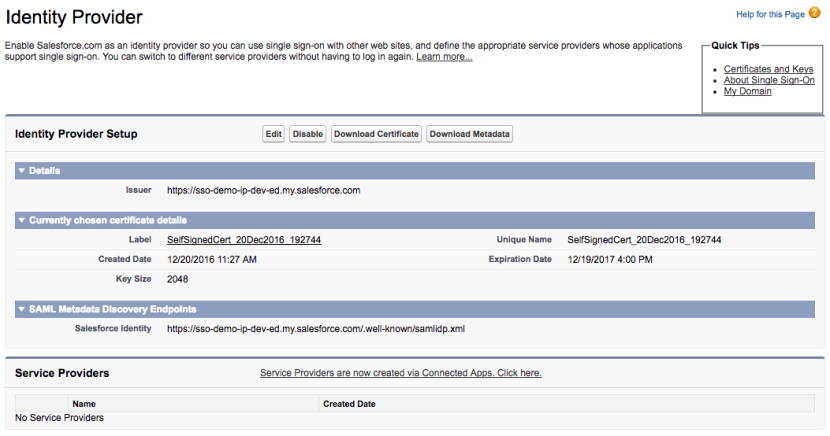
In Identity Provider Salesforce Org, from Setup, enter Identity Provider in Quick Find box, than Select Identity Provider and Click on Enable. Once you enable Identity Provider, You will get a screen like below. 

screenshot-ap4-salesforce-com-2016-12-27-17-40-48

Here you will find your domain name mentioned as Issuer and buttons to Download Certificate and Metadata. Click on Download Certificate button and save certificate. We will upload it later in Service Provider org. Here you can also Download Metadata file. We will talk about it later.

Step 3: Enable Single Sign On in Service Provider Organization

  • In Service Provider Salesforce Org, from Setup, enter Single Sign-On Settings in the Quick Find box, then select Single Sign-On Settings, and click Edit.
  • Select SAML Enabled. You must enable SAML to view the SAML single sign-on settings.
  • In SAML Single Sign-On Settings, click the appropriate button to create a new configuration, as follows.
    • New – Specify all settings manually.
    • New from Metadata File – Import SAML 2.0 settings from a XML file from your identity provider(We have downloaded it in Step 2).
    • New from Metadata URL – Import SAML 2.0 settings from a public URL.
  • Click on New and enter details as below and select Certificate, we downloaded in step 2 OR click on New from Metadata File and choose downloaded metadata file and save it.

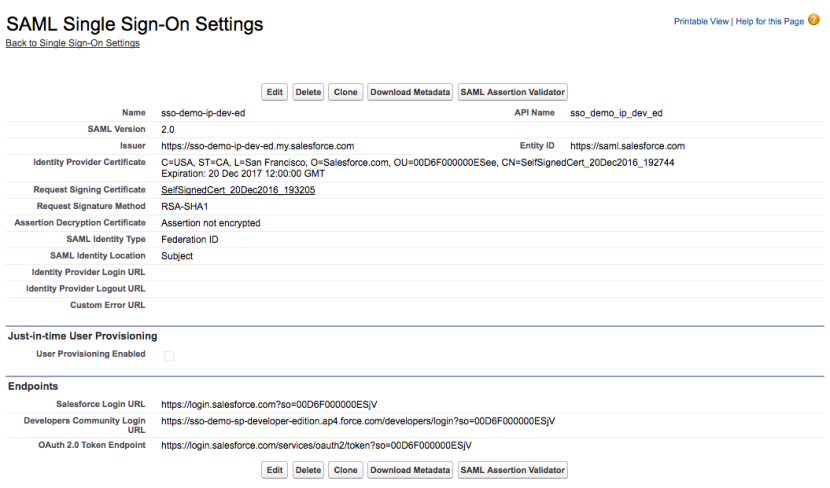
screenshot-ap4-salesforce-com-2016-12-27-18-45-51

In this above screen you can see there are 3 endpoints at the bottom. 

  1. Salesforce Login URL: This URL is useful if you want to configure SSO with your Salesforce Org.
  2. Developers Community Login URL:  Here Developers is my community name and this URL act as a Login URL for the Community. We are going to use this in next Step.
  3. OAuth 2.0 Token Endpoint: This is useful for OAuth 2.0 configuration. 

Step 4: Defining the Service Provider in the Identity Provider Organization

To define the service provider, you create a SAML enabled Web App as a connected app:

  1. Log in to the Salesforce organization that acts as the identity provider.
  2. From Setup, enter Apps in the Quick Find box, then select Apps, then in the Connected Apps section, click New.
  3. Specify the following information:
    Connected App Name Salesforce SSO App
    Contact Email Enter your support email address.
    Enable SAML Select this option to enter service provider details.
    Entity Id Use the Entity ID from SAML SSO Setting from Service Provider.
    ACS URL Use the Developer Community Login URL from SAML SSO Setting from Service Provider.
    Subject Type Select Username
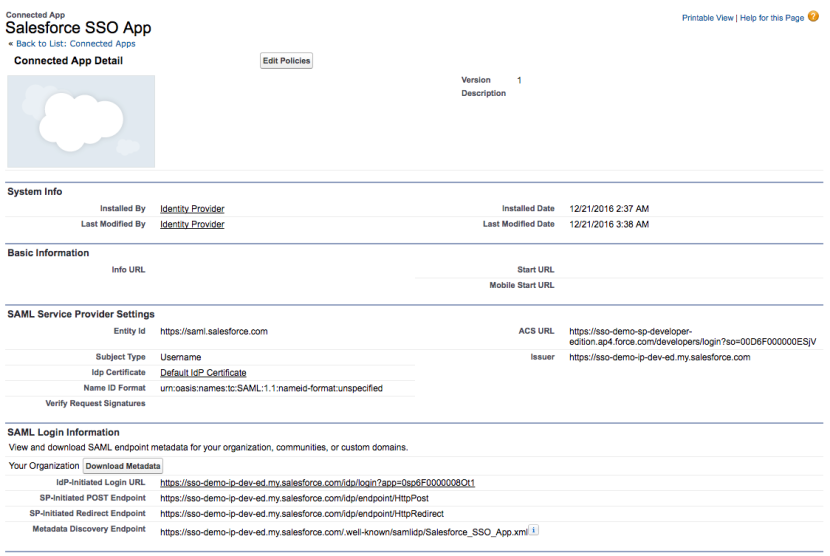
  4. Save it. After save, Your Connected App should look like:
    screenshot-ap4-salesforce-com-2016-12-28-17-23-29
  5. Select the profiles allowed to access this Connected App. You must select the current user’s profile for this example to work.
  6. Click Save.
  7. Copy down the value of the IdP-Initiated Login URL field. Open your Service Provider org in new window, Go to SAML SSO Setting page and click Edit for SSO Setting. Enter copied IdP-Initiated Login URL value in Identity Provider Login URL field and save it. We will be using this URL for login process.

That’s all about SSO configuration.


User Setup and Testing Your Implementation

To verify that your Salesforce organizations can use single sign-on to connect, follow below steps.

  1. Log in into the Service Provider Organization, Go to Contacts tab, click New.
  2. Enter value all the required fields, select valid Account and a valid email address. save it.
  3. Click Manage External User button, Enable Customer User link. Enter all required information on User Setup page. Select valid User License and Profile for Community access.
  4. In the Single Sign On Information section populate Federation ID field, enter the username used to sign into the Salesforce identity provider organization.
  5. Click Save.
  6. Now copy the IdP-Initiated Login URL from your Identity Provider Org’s connected app, Open any other browser, In new tab paste copied URL. Enter Username and password for your User configured with Service Provider user. If everything is configured well, this log in will open Community with Service Provider User as a logged in user.


Happy Configuration!!
Looking forward for your comments !!

Create a Lightning Component to Rate Your Opportunity

Hi All,

As we know with Winter 16 we got a new pilot feature by which we can customize Record Home Pages, Now we can add our custom Lightning components to Record Home Pages with App Builder.

This is my first article related to Lightning Component and to start with Lightning Components I build a small Star Rating Lightning Component using jQuery Raty – A Star Rating Plugin that allows you to give a rating to your Opportunity.

Watch the video demonstration below about How to install and use this component.
 

Note:

To use this component you need to create a new Custom field with api name Rating__c, Number(1, 0) on Opportunity Object. We will use this field to keep the rating for Opportunity record.

Source Code

Component

<aura:component controller="OpportunityRatingController" implements="force:hasRecordId,flexipage:availableForAllPageTypes">
    <ltng:require styles="/resource/RatingPlugin/css/jquery.raty.css, /resource/SLDS0120/assets/styles/salesforce-lightning-design-system-ltng.css" 
                  scripts="/resource/RatingPlugin/js/jquery.js, /resource/RatingPlugin/js/jquery.raty.js"
                  afterScriptsLoaded="{!c.doInit}"/>
    
    <aura:attribute type="ID" name="recordId"/>
    <aura:attribute type="Integer" name="currentRating"/>
    <aura:attribute type="Integer" name="newRating" default="0"/>
   
    <div class="slds">
        <div class="slds-card">
            <div class="slds-card__header slds-grid">
                <div class="slds-media slds-media--center slds-has-flexi-truncate">
                    <div class="slds-media__figure">
                        <div class="slds-icon__container">
	                    <img src="/resource/SLDS0120/assets/icons/custom/custom9_60.png" class="slds-icon slds-icon--small"/>
        		</div>
                    </div>
                    <div class="slds-media__body">
                        <h2 class="slds-text-heading--small slds-truncate">How much do you rate this Opportunity?        </h2>
                    </div>
                </div>
            </div>
            <div class="slds-card__body">
                <div class="loading-div">
                    <div class="slds-spinner--small">
	                <img src="/resource/SLDS0120/assets/images/spinners/slds_spinner_brand.gif" alt="Loading..."/>
	            </div>
                </div>
                <div aura:id="starRating" class="star-rating"></div>
            </div>
            <div class="slds-card__footer">
                <div class="footer-contents">
                    <div style="display: inline-block;">
                        Current Rating: <span aura:id="rating">{!v.currentRating}&nbsp;star</span>
                    </div>
            	</div>
            </div>
        </div>
    </div>
</aura:component>
  • As we have implemented force:hasRecordId interface the current record Id will be injected into recordId attribute.
  • The currentRating attribute is used to hold and display the current rating of the opportunity.
  • The newRating attribute is used to hold the new rating for the current opportunity.

Controller

({
    doInit : function(component, event, helper) {
        // load raty rating plugin.
        var ratingElement = component.find("starRating").getElement();
        helper.loadRatingElement( component, helper, ratingElement );
        
        // Get current rating for Opportunity
        var action = component.get("c.getOpportunityCurrentRating");
        action.setParams({
            recordId : component.get("v.recordId")
        });
        action.setCallback(this, function( response ){
            // update current rating attribute and set raty with current rating.
            component.set("v.currentRating", response.getReturnValue());
            $(ratingElement).raty('set', { score: response.getReturnValue() });
            $(".star-rating, .loading-div, .footer-contents").toggle();
        });
        $A.enqueueAction(action);
    }
})
  • This doInit method is responsible to load the raty plugin after scripts loading and update raty plugin with Opportunity’s current rating.

Helper

({
    loadRatingElement: function(component, helper, ratingElement){
        $( ratingElement ).raty({
            starOff  : '/resource/RatingPlugin/images/star_off_darkgray.png',
            starOn   : '/resource/RatingPlugin/images/star_on.png',
            click: function(score, evt) {
                if(score == null ) score = 0;
                if(component.get("v.currentRating") != score ){
                    var result = confirm('Click OK button to confirm update Rating.');
                    if( result ){
                        component.set("v.newRating", score);
                        $(".star-rating, .loading-div, .footer-contents").toggle();
                        helper.updateRating( component );
                    }else{
                        return false;
                    }
                } 
            }
        });
    },
    updateRating : function( component ){
        // update Opportunity record with new rating.
        var action = component.get("c.updateOpportunityRating");
        action.setParams({
            recordId : component.get("v.recordId"),
            rating : component.get("v.newRating")
        });
        action.setCallback(this, function( response ){
            alert('Great! You have given new rating to this Opportunity.');
            component.set( "v.currentRating", component.get("v.newRating") );
            $(".star-rating, .loading-div, .footer-contents").toggle();
        });
        $A.enqueueAction(action);
    }
})
  • The loadRatingElement method is used to load & set some default values for raty plugin.
  • The updateRating method is used to update Opportunity record with new rating.

Style

.THIS{
    margin: 10px 0;
}
.THIS div.slds-card{
    min-height: 135px;
    background: white;
}
.THIS div.star-rating{
    padding: 10px 0;
    display:none;
}
.THIS .star-rating img{
    width:2rem;
}
.THIS div.slds-card__body{
    padding: 0 10px;
    height: 55px;
}
.THIS div.slds-card__body .loading-div{
    position: relative;
}
.THIS div.slds-card__body .loading-div .slds-spinner--small{
    position: absolute;
    z-index: 9999;
    left: 45%;
    top: 15px;
}
.THIS .slds-media__figure{
    padding: 3px;
    border-radius: 0.2rem;
    background: #16325c;
}
.THIS div.slds-card__footer{
    height: 35px;
}
.THIS div.footer-contents{
    display:none;
}

Apex Controller

public class OpportunityRatingController{
    
    // Used to get Opportunity's current rating.
    // Params: recordId - Opportunity record id.
    @AuraEnabled
    public static Integer getOpportunityCurrentRating( Id recordId ){
        Opportunity oppRecord = [SELECT Id, Rating__c from Opportunity WHERE Id=:recordId];
        return oppRecord.Rating__c != null ? Integer.valueOf( oppRecord.Rating__c )  : 0;
    }

    // Used to update Opportunity record with new rating.
    // Params: { recordId: Opportunity record id, rating: new rating for this opportunity }
    @AuraEnabled
    public static String updateOpportunityRating(Id recordId, Decimal rating ){
        update new Opportunity( id=recordId, rating__c= rating);
        return 'SUCCESS';
    }
}
  • The getOpportunityCurrentRating method is used get the current rating of the Opportunity record at the time of page load.
  • The updateOpportunityRating method is used to commit new rating to Opportunity record.

Installation Instructions

  • Make sure you have Lightning Experience and App Builder enabled for your org.
  • Create different parts of this Star Rating Component as defined above: Custom Field, Apex Class, Lightning Component, Controller, Helper and Style. You can get the complete code and Required static resource from github.
  • Switch to Lightning Experience and follow the instructions in the video to use this component.

That’s all.
Hope you liked it.
Your suggestions to improve this, are always appreciated.

GETTING FIELD ID DYNAMICALLY TO PRE-POPULATE FIELDS VALUE FOR NEW RECORD

OVERVIEWRecently I faced a situation where I had to pre-populate some fields for a child record on its creation from its List view on Master’s detail page. This was little tricky as this thing was going to be a part of a Managed Package and I had to manage these fields Id in different Orgs.

As soon as I got the requirement the first thing that came in my mind is that Now I have to create a Custom Setting to hold all fields Id value and have to write my code by using this custom setting, I have to create record for it in orgs where I’m going to install the package, As all do.
But it was going to be like a headache, find field Id for all fields, configure them in custom setting where-ever I’m going to install package and after doing all configuration my code will start working fine.

I wanted to overcome this situation, So did some R&D on it and got my solution with very small and intelligent code.
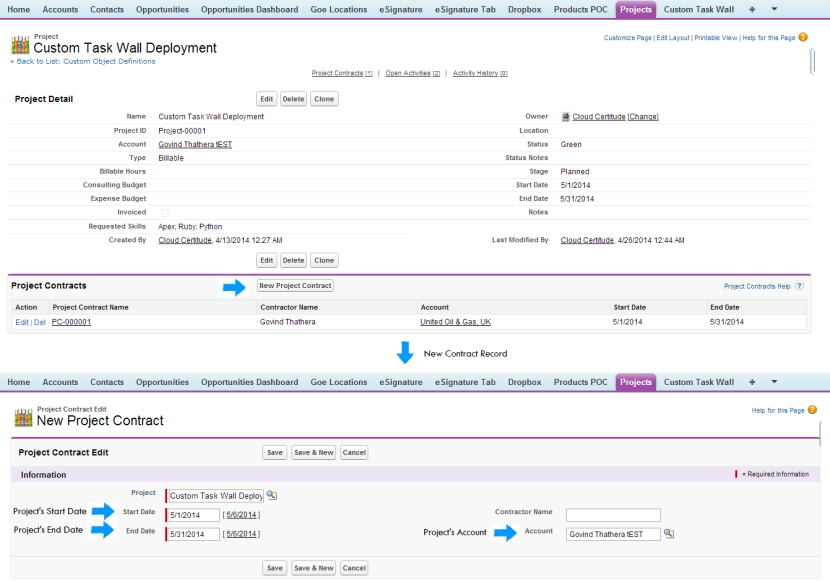
For your better understanding I’m having Project as a Master object and Project Contractor as its child and on click on New Project Contractor button it will pre-populate some fields on new Project Contractor record like Account Look-up field and Start & End Date fields from Its parent Project record.

Project_Project Contractor_full

For this I have created a Custom List Button on Project Contractor object and apex class with two webService methods that helps me in getting object keyprefix and fields Id dynamically in different org.
Here is my code for Apex class:

global class FieldIdWebService{
    // Get object key prefix.
    webservice static String getObjectKeyPrefix(String object_name){
        return ('/' + Project_Contract__c.SObjectType.getDescribe().getKeyPrefix() + '/e?nooverride=1');
    }
    
	// Get field Id of field by Its field label
    webservice static String getFieldId(String field_label){
        // Obtain the magic ids
        PageReference p = new PageReference('/' + Project_Contract__c.SObjectType.getDescribe().getKeyPrefix() + '/e?nooverride=1');
        String html = p.getContent().toString();
        Map<String, String> labelToId = new Map<String, String>();
        Matcher m = Pattern.compile('<label for="(.*?)">(<span class="requiredMark">\\*</span>)?(.*?)</label>').matcher(html);
        while (m.find()) {
            String label = m.group(3);
            String id = m.group(1);
            if(label.equalsIgnoreCase(field_label))
                return id; // return field Id.
        }

        m = Pattern.compile('<label for="(.*?)">(<span class="assistiveText">\\*</span>)?(.*?)</label>').matcher(html);
        while (m.find()) {
            String label = m.group(3);
            String id = m.group(1);
            if(label.equalsIgnoreCase(field_label))
                return id; // return field Id.
        }
        return '';
    }
}

After this I created List button on Project Contractor object with Javascript code:

{!REQUIRESCRIPT("/soap/ajax/23.0/connection.js")} 
{!REQUIRESCRIPT("/soap/ajax/23.0/apex.js")} 

// Get Project Id from Current URL 
var projId = window.location.pathname; 
projId = projId.substr(1, projId.length); 

// Get Project record 
var queryStr = "select Start_Date__c, Account__r.Name, End_Date__c, id, Name from Proj__c WHERE Id='"+projId+"'"; 
var result = sforce.connection.query(queryStr); 
var records = result.getArray("records"); 

// Get Project Contractor Object's prefix dynamically 
var objectKeyPrefixURL = sforce.apex.execute("FieldIdWebService","getObjectKeyPrefix",{object_name:"Project_Contract__c"}); 

// Get required fields Id. 
var startDId = sforce.apex.execute("FieldIdWebService","getFieldId", {field_label:"Start Date"}); 
var endDId = sforce.apex.execute("FieldIdWebService","getFieldId", {field_label:"End Date"}); 
var accountId = sforce.apex.execute("FieldIdWebService","getFieldId", {field_label:"Account"}); 
var projectId = sforce.apex.execute("FieldIdWebService","getFieldId", {field_label:"Project"}); 

// format date as date input box takes 
var d = new Date(records[0].Start_Date__c); 
var startDate = (d.getMonth()+1)+'/'+d.getDate()+'/'+d.getFullYear(); 
d = new Date(records[0].End_Date__c); 
var endDate = (d.getMonth()+1)+'/'+d.getDate()+'/'+d.getFullYear(); 

// Create new Project Contractor's URL 
var newURL = objectKeyPrefixURL+"&amp;"+projectId+"="+records[0].Name+"&amp;"+projectId+"__lkid="+records[0].Id+"&amp;"+startDId+"="+startDate+"&amp;"+endDId+"="+endDate+"&amp;"+accountId+"="+records[0].Account__r.Name+"&amp;retURL=/"+records[0].Id;

// Open new Project Contractor's record now 
window.location.href = newURL;

and Added this List button to List view of Project Contractor on Project page layout.
Here is the description of JavaScript code – In scripting code first of all I’m getting Master record’s Id from current URL that is Master’s detail page URL. After that, fetching master record fields based on record id, next calling webservice methods that we have created earlier and getting object key prefix and fields Id by passing fields Label to webservice function and at last creating new child record’s URL and changing current window location to new URL.
The new URL having Master record’s name, Id, Start Date, End Date and Account name and return URL as parameters.
It looks like:

https://ap1.salesforce.com/a0Y/e?nooverride=1&CF00N90000009sgHg=Custom%20Task%20Wall%20Deployment&CF00N90000009sgHg__lkid=a0M90000005OJE6EAO&00N90000009soly=5/1/2014&00N90000009som3=5/31/2014&CF00N90000009sgLy=Govind%20Thathera%20tEST&retURL=/a0M90000005OJE6EAO

It contains fields id and there default value in it for new record.

That all,
Hope you will like it.
Your suggestions to improve this, are always appreciated.

CREATING SIMPLE TREE VIEW IN VISUALFORCE

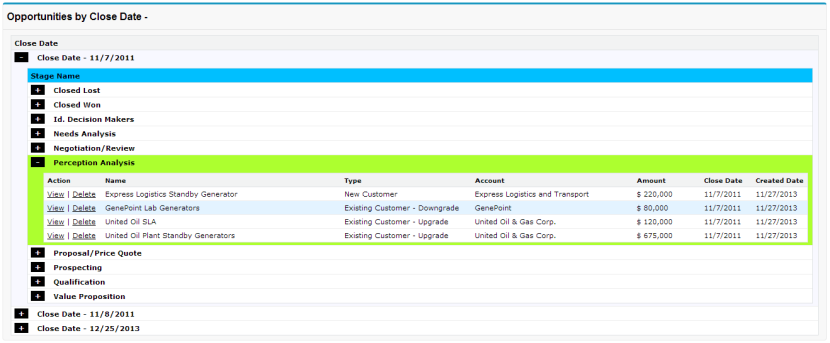
TreeView


PREFACE
Recently I had a requirement where one of my client wanted a Tree view for their data. For this I suggested them jQuery Tree plugins like jsTree, jQuery Treeview Plugin etc. But She wanted its look should be like and matching with Standard Salesforce View. So I created a tree view similar to this for her. Here I have shown a demo. You can view the Live Demo here.

OVERVIEW

Here I have created a tree view with Opportunity records, Separated them by Close Date for First depth and than By their Stage name for second depth. For building this view I used Standard Salesforce <apex:pageBlockTable> component and Some Jquery to make it as Tree view and for some color effect there.

Here is the code for Apex Controller class to get Opportunity records:

/*
*	Name	: OpportunityTreeViewController.cls
*	Author	: Govind Thathera
*/

public class OpportunityTreeViewController{
    
    public Map<String, Map<String, List<Opportunity>>> mapOpportunities{get;set;}
    
	// Get opportunity records - Calling it a page action attribute.
    public void fetchOpportunites(){
        
        mapOpportunities = new Map<String, Map<String, List<Opportunity>>>();
        
        for(Opportunity oppRecord : [Select o.Type, o.StageName, o.OwnerId, o.Name, o.IsWon, o.IsClosed, o.Id, o.Description, 
                                      o.CreatedDate, o.CreatedById, o.CloseDate, o.Amount, o.AccountId, o.Account.Name 
                                      From Opportunity o
                                      WHERE StageName in:getOpportunityStages() order by o.CloseDate Desc]){
                                      
            String closeDate = oppRecord.CloseDate.format();
            if(mapOpportunities.get(closeDate) != null){
                if(mapOpportunities.get(closeDate).get(oppRecord.StageName) != null)
                    mapOpportunities.get(closeDate).get(oppRecord.StageName).add(oppRecord);
                else
                    mapOpportunities.get(closeDate).put(oppRecord.StageName, new List<Opportunity>{oppRecord});
            }
            else{
                mapOpportunities.put(closeDate, new Map<String, List<Opportunity>>{oppRecord.StageName => new List<Opportunity>{oppRecord}});
            }                                                                            
        }                                                   
    }
    
	// Get List of Stage names of Opportunity.
    private static List<String> getOpportunityStages(){
        List<String> stages = new List<String>();
        // Get DescribeFieldResult for Opportunity StageName picklist.
		Schema.DescribeFieldResult fieldResult = Opportunity.StageName.getDescribe();
        List<Schema.PicklistEntry> ple = fieldResult.getPicklistValues();
            
        for( Schema.PicklistEntry f : ple){
              stages.add(f.getLabel()); // Add Stage Name to list.
        }       
        return stages; // Return all Stages.
    }
}

Here is the code for Visualforce page where I’m iterating this Map using <apex:pageBlockTable> component and applied some jquery there:

<apex:page controller="OpportunityTreeViewController" action="{!fetchOpportunites}" id="pg">
    <style>
        .sign-class{
            font-size: 12px;
            font-weight: 700;
            padding: 0px 5px;
            margin-right: 10px;
            border: 1px solid black;
            background: black;
            color: whitesmoke;
            margin-bottom:10px;
            cursor:pointer;
        }
        .pbBody table.list tr.dataRow td {
            font-family: verdana;
            font-weight: normal;
        }
    </style>
    
    <apex:form id="frm">
        <apex:pageBlock id="pb1" title="Opportunities by Close Date -">
            <apex:variable value="{!0}" var="dateIndex"/>
            <apex:pageBlockTable value="{!mapOpportunities}" var="dateKey" id="dateTable">
                <apex:column style="color: #000;font-size: 11px;font-family:verdana;font-weight: bold;">
                    <apex:facet name="header">
                        <span style="color: #000;font-size: 11px;font-family:verdana;font-weight: bold;">
                            Close Date
                        </span>    
                    </apex:facet>
                    <span id="date-sign-{!dateIndex}" class="sign-class" onclick="toggleDateTable('{!dateIndex}');">+</span>
                    <span style="color: #000;font-size: 11px;font-family:verdana;font-weight: bold;">
                        Close Date - {!dateKey}
                    </span>
                    <apex:variable value="{!0}" var="stageIndex"/>
                    <apex:pageBlockTable value="{!mapOpportunities[dateKey]}" var="stageKey" id="stageTable" style="display:none;margin-top:10px;margin-left:20px;width:98%;">
                        <apex:column style="color: #000;font-size: 11px;font-family:verdana;font-weight: bold;">
                            <apex:facet name="header">
                                <span style="color: #000;font-size: 11px;font-family:verdana;font-weight: bold;">
                                    Stage Name
                                </span>    
                            </apex:facet>
                            <span id="stage-sign-{!dateIndex}-{!stageIndex}" class="sign-class" onclick="toggleStagesTable('{!dateIndex}','{!stageIndex}');">+</span>
                            <span style="color: #000;font-size: 11px;font-family:verdana;font-weight: bold;">
                                {!stageKey}
                            </span>
                            <apex:variable value="{!0}" var="recordIndex"/>
                            <apex:pageBlockTable value="{!mapOpportunities[dateKey][stageKey]}" var="oppRecord" id="opportunityTable" style="margin-top:10px;margin-left:20px;width:98%;display:none;">
                                <apex:column headerValue="Action" style="width: 85px;">
                                    <apex:outputLink value="javascript:void(0);" target="_Blank">View</apex:outputLink>&nbsp;|&nbsp;
                                    <apex:outputLink value="javascript:void(0);" target="_Blank">Delete</apex:outputLink>
                                </apex:column>
                                <apex:column headerValue="Name" value="{!oppRecord.Name}"/>
                                <apex:column headerValue="Type" value="{!oppRecord.Type}" style="width: 200px;"/>
                                <apex:column headerValue="Account" value="{!oppRecord.Account.Name}" style="width: 250px;"/>
                                <apex:column headerValue="Amount" style="width: 100px;">
                                    <apex:outputText value="$ {0, number,###,###,###}">
                                        <apex:param value="{!oppRecord.Amount}"/>
                                    </apex:outputText>
                                </apex:column>
                                <apex:column headerValue="Close Date" value="{!oppRecord.CloseDate}" style="width: 75px;"/>
                                <apex:column headerValue="Created Date" style="width:80px">
                                    <apex:outputText value="{0, date,MM/dd/yyyy}">
                                        <apex:param value="{!oppRecord.CreatedDate}"/>
                                    </apex:outputText>
                                    <apex:variable value="{!recordIndex+1}" var="recordIndex"/>
                                </apex:column>
                            </apex:pageBlockTable>
                            <apex:variable value="{!stageIndex+1}" var="stageIndex"/>
                        </apex:column>
                    </apex:pageBlockTable>
                    <apex:variable value="{!dateIndex+1}" var="dateIndex"/>
                </apex:column>    
            </apex:pageBlockTable>    
        </apex:pageBlock>    
    </apex:form>
    
    <!-- Script Part -->
    <script src="//code.jquery.com/jquery-1.10.2.min.js"/>
    <script>
        $(document).ready(function(){
            $(esc('pg:frm:pb1:dateTable:tb')+" > tr").attr("onmouseover","");
            $("[id$='stageTable:tb'] > tr").attr("onmouseover","");
            $(esc('pg:frm:pb1:dateTable:tb')+" > tr > td").hover(function(){$(this).css("background-color","ghostwhite");}, function(){$(this).css("background-color","white");});
            $("[id$='stageTable:tb'] > tr > td").hover(function(){$(this).css("background-color","greenyellow");}, function(){$(this).css("background-color","white");});
            $("[id$='stageTable'] > thead .headerRow").css("background-color","deepskyblue");
        });
        
        function toggleDateTable(index){
            var signtext = $("#date-sign-"+index).text();
            var tableId = 'pg:frm:pb1:dateTable:'+index+':stageTable';
            if(signtext == '+'){
                $("#date-sign-"+index).text('-').css("padding", " 0px 7px");
                $(esc(tableId)).show();
            }
            else{
                $("#date-sign-"+index).text('+').css("padding", " 0px 5px");
                $(esc(tableId)).hide();
            }
        }
        
        function toggleStagesTable(rootindex, childindex){
            var signtext = $("#stage-sign-"+rootindex+"-"+childindex).text(); //address-sign-index-addIndex
            var tableId = 'pg:frm:pb1:dateTable:'+rootindex+':stageTable:'+childindex+':opportunityTable';
            if(signtext == '+'){
                $("#stage-sign-"+rootindex+"-"+childindex).text('-').css("padding", " 0px 7px");
                $(esc(tableId)).show();
            }
            else{
                $("#stage-sign-"+rootindex+"-"+childindex).text('+').css("padding", " 0px 5px");
                $(esc(tableId)).hide();
            }
        }
        
        function esc(myid) {
            return '#' + myid.replace(/(:|\.)/g,'\\\$1');
        } 
        
    </script>        
</apex:page>

That’s all.
Hope you will like it.
Your suggestions to improve this, are always appreciated.

Thanks,
Govind Thathera

Creating Web-services in Salesforce and using them with External Systems

PREFACE

Recently I had a requirement where one of my client wanted to interact with their Salesforce org to upsert some information in their org from an External Java based system, and they wanted it through web-services. This post will cover what I have learned in regards to web-services with this requirement and what steps I had taken for this, caveats with them and common pitfalls.

OVERVIEW

The goal of our web-services is to allow an external application to invoke a call to it to perform some action in Salesforce. Creating Web Services in Force.com is as simple as creating an Apex class.
Here is an Example:

// Web-Service Class.
global class MyWebService {
    // Web-Service method that will be executed by the external system.
    webService static Id makeContact(String lastName, Account a) {
        // Create new contact record and insert it.</span>
        Contact c = new Contact(lastName = lastName, AccountId = a.Id);
        insert c;
        return c.id; // Return newly created contact id back.
    }
}

Here I have created a WebService that takes two parameters from external system and creates an new contact in salesforce. For creating an apex class as Web Service, We use the webService keyword with the methods of the class and class must be declared a global. For more about this keyword you can get it Here.
Generate and Download WSDLs
Now to execute this from java we need the enterprise WSDL or Partner WSDL and WSDL of the Web Service class that we have created. We use the enterprise or Partner WSDL as per our need. You can get more about them Here. To get your org-specific WSDLs, log into your organization and then click Your Name | Setup | App Setup | Develop | API. For Web Service WSDL, go to the Apex class and click on Generate WSDL button to generate WSDL.
Generate Client-Side Java Code
To convert this WSDLs into java source classes you can use Apache Axis.
Now return to your Terminal or Command Prompt window, change your working directory to ‘../axis/WEB-INF/lib’ and paste your WSDLs here, and then generate stub client code as follows.
To generate the enterprise and partner client Source files, run the following command with the WSDLs you downloaded from your organization.

java -classpath axis.jar;axis-ant.jar;commons-discovery-0.2.jar;commons-logging-1.0.4.jar;dsn.jar;imap.jar;jaxrpc.jar;log4j-1.2.8.jar;mailapi.jar;pop3.jar;saaj.jar;smtp.jar;wsdl4j-1.5.1.jar org.apache.axis.wsdl.WSDL2Java -a enterprise.wsdl
	
java -classpath axis.jar;axis-ant.jar;commons-discovery-0.2.jar;commons-logging-1.0.4.jar;dsn.jar;imap.jar;jaxrpc.jar;log4j-1.2.8.jar;mailapi.jar;pop3.jar;saaj.jar;smtp.jar;wsdl4j-1.5.1.jar org.apache.axis.wsdl.WSDL2Java -a partner.wsdl

and for Web Service class:

java -classpath axis.jar;axis-ant.jar;commons-discovery-0.2.jar;commons-logging-1.0.4.jar;dsn.jar;imap.jar;jaxrpc.jar;log4j-1.2.8.jar;mailapi.jar;pop3.jar;saaj.jar;smtp.jar;wsdl4j-1.5.1.jar org.apache.axis.wsdl.WSDL2Java -a WebServiceClass.wsdl

After executing these commands you will get a folder created in your ‘../axis/WEB-INF/lib’ path as com.sforce.soap.enterprise and com.sforce.soap.schemas._class.MyWebService that contains all your Java code Source files.
Creating an Enterprise WSDL Application
Now that your environment is ready to go, It’s time to build a test application to see how things are working. In Eclipse, complete the following steps to build a Java application based on the enterprise WSDL.

  • Create a new Java project named “WebService – Enterprise” (click File | New | Java Project).
  • Add all JAR files present in ‘../axis/WEB-INF/lib’ to the project (click Project | Properties | Java Build Path | Libraries or External Libraries, then add the JARs to the project.)
  • Add com.sforce.soap.enterprise and com.sforce.soap.schemas._class.MyWebService folders, to the src folder in your app.
  • Create a new class com/sforce/soap/schemas/_class.MyWebService/MySFDCWebService.java and paste in the code from the code listing that follows.
  • Replace the stub user credentials in the code with your own user name and password with security token for the appropriate static members, then save your source code.
  • Run the application.
/*
* 		Name		: MySFDCWebService
* 		Author		: Govind Thathera
*/

package com.sforce.soap.schemas._class.MyWebService;

import java.net.URL;
import org.apache.axis.AxisFault;

import com.sforce.soap.enterprise.LoginResult;
import com.sforce.soap.enterprise.SessionHeader;
import com.sforce.soap.enterprise.SforceServiceLocator;
import com.sforce.soap.enterprise.SoapBindingStub;

public class MySFDCWebService {
    public static void main(String[] args) {
		// TODO Auto-generated method stub
		try{
			//Get a stub for calling Enterprise WSDL's login method in order to get SessionID
			SoapBindingStub bind= (SoapBindingStub)new SforceServiceLocator().getSoap();
			LoginResult lr=bind.login("your_org_username", "your_org_password");
		 
			//Create a sessionHeader object and set its sessioId property to sessionId 
			//received in loginResult object                    
			SessionHeader sh=new SessionHeader();
			sh.setSessionId(lr.getSessionId());
		 
			//Create a service locator object for MyWebService web service
			MyWebServiceServiceLocator locator=new MyWebServiceServiceLocator();
		 
			//Get URL for MyWebService web service
			URL url=new URL(locator.getMyWebServiceAddress());
		 
			//Create a stub for MyWebService web service with URL of
			//web service and locator as parameters
			MyWebServiceBindingStub stub=new MyWebServiceBindingStub(url, locator);
		 
			//Set the header property of stub with name "SessionHeader"
			//and value as sh-sessionHeader, object created above 
			stub.setHeader(locator.getMyWebServiceAddress(), "SessionHeader", sh);
		 
			//make call to MyWebService web service by passing 
			//Contact's Last Name and Account Id.
			String newContactId = stub.makeContact("Thathera", "00103s54ASCDFFX");
			System.out.println("Newly Created Contact's Id: "+newContactId);
		}
		catch (Exception e) {
			e.printStackTrace(); 
		}  
    }
}

When you successfully run the application, It will insert an Contact with Last name ‘Thathera’ in Salesforce for given Account’s Id. That’s all. Customize it as your requirement. 🙂